Monday, December 19, 2011

The SMASH Books Are Done!

FINALLY! I got all four of the Smash books that I am giving my four daughters for Christmas done! I took lots of pictures of what I used and the finished pages. Hope you enjoy seeing my huge accomplishment!
First up is a picture of all the "stuff" I collected to add to the books:
 Here is a list of some of the items:
       * printed sticky notes
       * various stickers
       * Smash mini note tabs
       * Smash pads
       * elastic headbands
       * die cut chipboard tags
       * colored paperclips
       * vellum tiny envelopes
       * mini zip-lock plastic bags
       * little calendars
       * colored note cards
       * print cardstock & acct ledger pages
       * die-cut shapes
         Also pictured below: stamps and ink, adhesives
I have a large island in my kitchen so I was able to spread all my stuff out and work on all the books at the same time. I would concentrate on one but when I used a stamp I would try to stamp the same one in all or most of the books.
 Before getting started I die cut some of the lined colored notecards to add to some of the pages that were not lined at all...I know my girls love to write alot! Empty lines on a notecard are encouraging...just waiting to be filled!
 
I used printed cardstock to make pockets which I added to a few pages and in the front cover of each book. I also made a few clear plastic pockets but they didn't turn out as well. I had the wrong kind of plastic...too slippery I think.
In each book I tucked in a pocket a small zip-lock bag of extra note cards, die cuts, tags, embellishments and the Smash Pad pages.
I will encourage my girls to watch a few You Tube tutorials on the Smash books. I watched some and was totally inspired!
Here are just a few pages that show some stickers and stamps I added as well as the bright flower die cuts.

 The Smash books come with a wonderful variety of 2-sided heavy cardstock pages, beautiful and unusual designs as well as thought provokoing words. I will tell my girls that if there is something they don't care for they can simply cover it with a pictures or note, etc.
 A few more example pages; 2 of the girls have/will have new babies so I was sure to include some baby boy pages! The colored notecards were so easy to use and became nice design elements.
I didn't do anything to the covers of the books. They are already embossed with a really neat design and I wanted to keep them neat and clean, easy to carry and tuck in a book bag or diaper bag or purse, without stuff falling off! And to keep them closed I bought the elastic headbands which fit perfectly...I know Smash has some available in cool colors but these were cheaper...and I AM Dutch!
If anyone has questions about how I did anything in these books just leave a comment and I will get back with you soon!
I'd LOVE to hear what you think of this project anyway!!

I got my Smash books at http://www.stampingscrapping.com/
as well as a bunch of the other stuff used in these books!

Monday, December 5, 2011

Christmas Card with a Bit of Recycling

Well, today I am finally posting a card that I have been working on...off & on...for a few weeks now! I cut the main die cut and "admired" it for at least a week...'cause I couldn't figure out what to do with it at first. The last time I used this die I added flowers that matched the "flower silhouettes" on the 2 ends, so I decided to try the same thing only with poinsettias. So here is what I came up with!

I am entering this card in one challenge at http://shoppingourstash.blogspot.com/
The challenge is #28 - either a "digi image" or "recycled" card. I used a recycled  sentiment from a Christmas card I got last year...its on the inside of the card.

I like to hold the 2 front pieces together with something when the card is closed so this time I used a paper "strap" decorated with leaves and a small "hook & loop" self-adhesive set that can be used over and over.

It is hard to see in my photos but I did use a lot of Stickles! The poinsettias have some and the dark green stripes on the inside. Some of the green card stock is glitter paper.
Here is my list of ingredients:
Card stock: DCWV - "Latte Matstack" & "Holiday Collection"
Die cut: from the Sizzix "Card, A2 Gate Fold w/Flower Silhouette"*
Flowers & Leaves: EK Success "Flowers & Leaves" punch
Stamp: "Merry Christmas" and black Die Ink by Stampabilities
Glue Dots*
Stickles - "Icicle"*
 Kool tak - Hook & Loop*
Small flower sequins are from my stash
A recycled Christmas card!

 * Starred items are all available at http://www.stampingscrapping.com/

Sunday, December 4, 2011

Chef Gilli with Flourishes

Good evening! Just enough time to do a quick post so I can enter this Gilli card in the "Flourishes" challenge #21 at http://houseofgilli.blogspot.com/
Here is my card:
Ingredients:
The stamped image is "Gilli Chef" colored with colored pencils
the kraft & green cardstocks are from my stash
the red with the FLOURISHES is Best Creation, from the Merry Christmas glitter pad
the gingerbread men are Mrs. Grossman's stickers
the sentiment is computer generated
its all held together with Glue Glider "High Tac"

Friday, November 25, 2011

Sizzix Die Cut B-day Card

 Today is Black Friday, and No, I did not go out shopping today at all! Did a little online Christmas shopping last night though...at Black Friday prices! 
Anyway, this card, with so much black on it, I thought  would be appropriate today! This was my daughter Emily's birthday card. The whole card is a die cut from the Sizzix die* called "Card, A2 Gate Fold w/Flower Silhoutte". The flowers are 3 layers: the first layer is a matching Sizzix "Scalloped Flower"; 2nd layer is a silk polkadot flower I had; top layer is a punch out from the "Flowers & Leaves" EK Success punch, plus a rhinestone. The little flowers and ribbon are from my stash. The 2-sided cardstock is called "Out of Print" by Basic Grey*.
On the inside are 3 different stamps: the Bible verse is from My Heart Stamps For You, the "Happy Birthday" is All Night Media, and the birthday sentiment  is ???
* the starred items are available @ http://www.stampingscrapping.com/ ...I think they are part of the Black Friday Sale even! Check it out!

Wednesday, November 23, 2011

Thankful!

 Happy Thanksgiving to YOU!
 Yes, I'm thankful for so many things in this "Thankful" season! I'm thanking God today, first, that I may know Him...because Jesus His Son made that possible by paying for my sins on the cross; and also for the many, many blessings I experience every single day: the love of family and friends, the abundance of good "things" like my lovely home, my faithful church, plenty of food and clothing, the beauty of nature, good health...but especially the priveledge of living in a country that still treasures freedom and the people willing to serve in the armed forces to defend that freedom.
I realize that many people are not as "fortunate" as me and may find it painful to read about my blessings. I do understand that and my heart goes out to you. We all go through different seasons of our lives...this is a very pleasant one for me. But there will undoubtedly be other seasons more difficult to bear. I am thankful today that...come what may...I know I will be carried through by Someone far stronger and capable than me, my Redeemer, who reminds me each day:
"But those who wait on the LORD shall renew their strength; they shall mount up with wings like eagles, they shall run and not be weary, they shall walk and not faint." Isaiah 40:31
And I am thankful for all my blogging/crafting friends that I have met through my cardmaking and blogging! I'm hoping & praying that each of you has a very blessed Thanksgiving holiday!
This simple card is for all of you reading this!
It's simple because it has only 2 main elements: the printed cardstock and the die cut. The cardstock is called "Hello Fall" by Best Creation; the die cut is a GEO Die, this is #10; and the sentiments are from the SSD Stamps set "Happy Fall". I also used Glue Dots and Stix 2 Anything pop squares. All of these items are available at http://www.stampingscrapping.com/ . The baler twine and the tan cardstock are from my stash.

Friday, November 18, 2011

Monochromatic Thank You Card

This pink & white Thank You card is being entered in:
http://housemouse-challenge.blogspot.com/  Challenge #108,  "Thankful Cards"  and
http://houseofgilli.blogspot.com/  "Monochromatic"

Ingredients:
HM stamp is "Contented Mudpie"*
   (colored w/colored pencils)
Flower is from SSD Gardenia Pack, pink & purple*
Die cuts are Spellbinders Labels 4*
Cuttlebug embossing folder
"Thank You" stamp - ??
Ribbon & Card stock are from my stash
*starred items are from StampingScrapping.com

Hope you are all having a nice, productive Friday!
Happy weekend to you all!

Thursday, November 17, 2011

A "Red & White" Maggie Card


Good evening! I haven't entered any cards in challenges for a couple weeks now so that is what I'm doing tonight. I used a Magnolia image, actually 2 of them, for this "Thinking of You" card for the RED & WHITE challenge.
I don't remember the names of the 2 Maggie images, the sitting Tilda or the stack of books, but if someone does know the name(s) please let me know. I got the stamped images from a friend quite a while ago.
 The stack of books I did alter slightly...I removed the bottom book! So the stack is a little shorter but it works perfectly with Tilda because it looks like her feet are each resting on a different book. I used colored pencils again and this time I'm not so happy with the results. Oh well. Its already in the mail!

Ingredients used:
1) Card stock is all from my stash
as are the heart stickers and the red rhinestones
2) Sentiment is computer-generated
3) Bible verse is a Verve stamp
4) Spellbinders dies*: Classic Circles Lg & Labels 4
5) Glueglider PermaTac*
6) and of course, the Magnolia* images
*from StampingScrapping.com

I am entering this in the Magnolia Stamplovers "Red & White" challenge at
Oops! I jumped the gun on this one! I will have to wait until Nov. 20 to enter that challenge...this week's was supposed to be "Christmas". And I thought I was getting organized!!

Monday, November 14, 2011

New Baby: Jonathan!

Wow! Its been a couple very busy weeks around here! I now have SIX grandchildren! The new one is a tiny adorable boy-bundle named Jonathan Russell (Dad's name is Russell). He was born November 2 at about 4:30 AM, weighed 6# 4 oz. and was 19 inches. Mom (Chris) and baby did fine and they are home adjusting to a new life, actually the whole family is readjusting. His 2 older brothers play just as noisily as before and Jonathan sleeps right through it! Here he is:

I offered to make some "new baby" announcements for them. I made about 15, all just a little bit different but with the same basic BLUE card stock and the same nursery animal stamped images (from Stampin' Up). On the inside is a little form for Chris to fill out with all the pertinent data, and a Bible verse: either
  • Ps. 139:13-14 "For you formed my inward parts: You covered me in my mother's womb. I will praise You, for I am fearfully and wonderfully made; Marvelous are Your works, And that my soul knows very well." OR
  •  Ps.127:3-5a "Behold, children are a heritage from the Lord, The fruit of the womb is a reward. Like arrows in the hand of a warrior, So are the children of one's youth. Happy is the man who has his quiver full of them..." 

I had quite a stash of colored buttons so I attached some on most of the cards. I tried to use very flat embellishments on some of the cards so it would be easier for her to mail them. I only took a picture of the last 2 cards. In the blank area inside the card Chris will attach a wallet-size picture of Jonathan.

Sunday, November 6, 2011

Autumn Anniversary

65th Anniversary card for a sweet couple at my church, Don & Alice.
Saturday was a beautiful fall day for their "open house"!

                                              
This card features 2 special items that Cindy carries at http://www.stampingscrapping.com/ :
The lacey folded die cut is from a GEO Die (this is #8)
The designer paper is from Best Creation 6x6 pad called "Hello Fall"
(the scalloped circle is one of the glitter die cuts in the set of 20 sheets)
Both of these items are easy to use so you can make a quick yet beautifully detailed card!


I also used some SSD flowers- "Flowers & Brads, Purples", but the green one
is from another pkg.- "Flowers Plus, Beige & Olive".
I have several pkgs and often mix and match colors and sizes to get the perfect layering look I want.
I love using these pretty flowers! Cindy carries such a huge variety of them...and they are only $2.84/pkg!
The little tag is half of a K & Co. die cut from the "Blue Awning" set. On that I stamped the
"Happy Anniversary" from the "Congratulations" set of Cindy's (SSD) stamps.
The ribbon, rhinestones and tan card stock are from my stash.

Thursday, October 27, 2011

Halloween Card & Treat Bag

You know those GEO Dies I was ooohing and aaahing about? Well I did use some on one more Halloween card and then made a treat bag to sort of match. The large die cut is GEO Die #8 and small is GEO Mini #3. I attached the big one to the card with PopDots , then the mini to that one with PopDots and the added the little cute ghost with PopDots. I like to be able to see through the lacey designs.
Below is a side-ish view to show the "popped" effect. I used a double layer of PopDots between the 2 GEO Dies diecuts. Some how I think they seem to have an illusion of spinning, maybe because these remind me of a pinwheel.
Here is my list of ingredients: (everything with a * can be found at http://www.stampingscrapping.com/ )
PopDots*
ScorTape*
Glue Dots*
Geo Dies*- Lg. #8 & Mini #3
Cardstock is Best Creation 6x6 Glitter pad called "Happy Haunting"* (all of those patterns!)
Circle stamp is JustRite*, colored with colored pencils
"Happy Halloween" stamp is from StampingScrapping Designs, the "Holiday" set*
Ribbon & Buttons are from my stash

Now a few pix of the treat bag I made. I have 5 grandkids so I think I'm going to need to kick it in gear and quick make 4 more! The bag topper is a Sizzix die cut. The die plate is called "Treat Bag Toppers"*. So easy! It has the cute scalloped edge and 2 little holes near the top for ribbon or string. I stapled it on the bag and then added the decorations. The die plate has 3 sizes of toppers, small, medium amd large (I used large) as well as hearts, ovals and a fancy label. The toppers punch out as a square and have a line to show where to fold them in half. The other toppers are different shapes...even cuter!
My other ingredients (besides the candy!):
Vintage Black Twine*
Witches hat, face & feet, from the "Best Witches" set from StampingScrapping*
(and the "treat" sentiment)
"Spooky" sentiment is from the "Holidays" set, also from SS


Just Hello!

No project today...just saying hello. And I have to brag a bit! I got to go to Cindy's store (http://www.stampingscrapping.com/) and see alot of the new products they are now carrying! Wow! What cool stuff! Have you looked at the GEO-Dies? They make the most amazing intricate designs! They are designed to work in almost any cutting/embossing machine.  Here's one:
                                                                                
I've used a few of them already. One I put a small image in the center and on another I used PopDots and put a mini right on top of a regular size one. Looked great! I'll post my creations soon, I hope! Just need a bit more time in my day!
Hope you are having an excellent week!
Have a safe Halloween!

Sunday, October 23, 2011

My Mom's Birthday Card

My dear little mother is having her 86th birthday next week. We are going to Wisconsin to see her then and celebrate the special day with her. I'll also get to spend a little time with my sister and 2 brothers. My sister, Judy,  likes to stamp and make cards too so I will undoubtedly haul along some of my crafty stuff and we will have fun together. Mom just watches and smiles.
Anyway....I followed a sketch from Mojo Monday for this card and will enter it in their challenge at:
http://mojomonday.blogspot.com/  - #211.

Here is my list of items I used in making this one:
(the *'d items came be found at http://www.stampingscrapping.com/)
Stamped flower image is from Stampin' Up
Papers and cardstock are Paper Studio and DCWV*
Edge punch is "Doily Lace" from Martha Stewart*
Rhinestones are from Michaels
Birthday sntiment is from JustRite*
Glue Dots* & ScorTape*
Ribbon and button are from my stash
Inside:
Computer generated greeting
Bible verse is from Verve Stamps

Saturday, October 15, 2011

Another HM Halloween Card

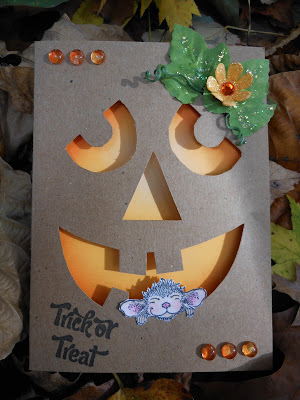
Not sure if we are allowed to enter more than one card in the HM Challenge or not but I thouhgt I would at least post this one here 'cause I actually like how it turned out! I always loved carving pumpkins as a kid and with my kids while they grew up but now no one does it any more. Sooooo....I got this idea to "carve " a pumpkin face on a card! What do you think?
   (I sent an email to America at HM and she says its OK to enter another card! So I will!)
The main cardstock is kraft and the orange on the inside has been inked with white, yellow and orangge ink using the Tim Holtz blending tool. The HM stamp is "Feelin' Rosey" (Maxwell minus the teacup!).
I really do love the teacup but I keep finding things that would be so cute to see him peeking over the edge of...I just can't resist! Had to try it!
The "Trick or Treat" stamp and the sparkley flower and the "Twinkle Jewels" are all from StampingScrapping.com. And so is the "Happy Halloween" and the little ghost on the inside.
Leaves and green wire are from my stash.
Entering this one in:
(use black, orange, yellow and green)
I took these pictures on my deck which is totally covered with leaves right now. We live in a woods and because its so windy today it is just raining leaves!
Here's a picture of my "back yard":

I hope you are all having a lovely day, wherever you are and whatever season it is for you! God bless!

Wednesday, October 12, 2011

A Mousey Halloween Card

 Yesterday evening I finished my first little Halloween card. I don't usually make them because we don't really celebrate Halloween much. But I like the colors associated with it and especially the colors called for in the flollowing challenges that I am entering this in:
http://housemouse-challenge.blogspot.com/ - "Halloween Color" #106,
(use black, orange, yellow and green)
http://houseofgilli.blogspot.com/  #18 "Purple, Orange, Green, Black & White (pick 3)"
Items used:
House Mouse stamp "Contented Mudpie"* &
  hand-drawn pumpkin, both colored with colored pencils
"Happy Halloween" sentiment is computer generated
Silk leaf, wire curly-Q's, black ribbon and netting - all from my stash
The green Halloween cardstock is Imaginisce
(the rest of the cardstock are brands I forgot to make note of)
The "BOO" sentiment is from the "Holidays" set* from StampingScrapping
Inks: orange is Stampabilities die ink, black is StazOn solvent ink
Adhesives: Glue Dots*, ScorTape*, ProGlider- high tac*
Rhinestones are from Target, I think!
AND... I used LOTS of "Icicle" Stickles*!

Items with a * are available @ http://www.stampingscrapping.com/

Thanks so much for stopping by today! If you have a minute, please leave a comment...just "Hello" is fine! I'm trying to find out if I have my settings for my blog set wrong. Is it difficult to leave comments here? I do have that trouble with a few other peoples' blogs and hope I am not causing frustration for others! Let me know if there is a problem! THANK YOU!
(my email: fivensandie@aol.com)

Sunday, October 9, 2011

A Wedding Card

Congratulations to Bryan & Rachel who became husband and wife this past Friday evening! This card is for them.
List of items used to make this card:
Stamped image is "Medallion de Fleur" from Clear Dollar Stamps
Lavender ink is from Studio G
Rhinestones are by Kaiser Craft
Purple cardstock is from the "Latte" collection by DCWV
White cardstock is Cryogen
Flower is from StampingScrapping
The "Congratulations" sentiment is also from StampingScrapping
from the "Wedding/Celebration" set
Punched border is "Doily Lace" by Martha Stewart
Ribbon and netting is from my stash


I am entering this in one challenge:

Saturday, October 8, 2011

Card for an 80th Birthday

This afternoon we attended an open house for a gentleman from our church who's 80th birthday is tomorrow. He's amazing...he certainly does not look or act his age. Great attitude and a steady, happy disposition. I hope someone can say that of me when I get to be that age! But I fear I'm getting a bit more "crotchity" every year! I should have asked him his secret!
Anyway, the card I made for him turned out okay, except for the "80th" little tag...not happy with that for some reason. I think it stands out too much, probably because the "Happy Birthday" sentiment didn't stamp very black. It looks worse in the picture than it did in "real life"! Oh well, its done and gone. Hope he likes it!


The flower image I used is a Magnolia* but I can't find the name of it. Anyone know?
I colored it with colored pencils and drew the "stitches" with red marker.
The birthday sentiment is an Allnight Media stamp.
The red cardstock is DCWV from the "Holiday Collection".
The embossing folder I used was from Cuttlebug/Provo Craft.*
which I sanded to give it the distressed look.
The rest of the cardstock and paper is from my stash.
So are the rhinestones, and red sparkle cord.
As always, I used lots of Glue Dots* and ScorTape*.
(the *'d items I got from StampingScrapping.com)

Here are the challenges I am entering this one in:

Thursday, October 6, 2011

Autumn Colors! Fall Card...

Wow! Fall is here! All of a sudden! The leaves are changing color right before my eyes...so pretty, especially on a sunny day like today! God is THE most amazing artist!

This evening I finally finished this card that I have been working on (off & on) for a couple weeks now. I colored the Gilli image quite some time ago so I just needed to  re-colored the background around her a bit.
The Gilli image is called "Gilli Chef" (from http://www.anary.com/) and she is colored with colored pencils, as are the little leaves, apples, and pumpkins...those are from clear stamps designed and sold by http://www.stampingscrapping.com/ (from the Happy Fall set and the Best Witches set).
The dies I used are Spellbinders, the Standard Circles Lg. and Big Scalloped Circles Lg.
The cardstock, paper, and bailer twine (bow) are from my shamefully large stash!
Oh, and the sentiments are computer generated.
 I am entering this one in one challenge, #17 - "Fall Card" at http://houseofgilli.blogspot.com/.
I hope you are all enjoying this lovely Indian Summer weather we're having! Those of you in other parts of the country...and the world (!)...may you also be blessed with some beautiful days this month!
Thanks for stopping by! Leave a comment if you like....I love to read them!

Sunday, October 2, 2011

Happy Fall Y'all!

That is the theme for the challenge at Woodware USA Clear Stamps. I love making Fall cards...the colors are so rich and warm. And I love using leaves in my designs. This is an "after-surgery" Get Well card.
Here is the list of ingredients for this one:
The stamped images on the yellow paper are a combination of "Leafy Swirls" from Woodware USA Clear Stamps and "Tiny Leaves" from Clear Dollar Stamps
The stamped Get Well sentiment is from Stampabilities
The inside sentiment (next photo) is computer generated
The flower is from StampingScrapping.com
The DP is from the "Indian Summer Fall Stack" by DCWV
On the inside I used several sizes of Labels 4 die cuts from Spellbinders
The gold stretchy string is from my stash
The brown ink I used is Vivid
The challenge I'm entering this card in is #45 "Happy Fall Y'all" at

Friday, September 30, 2011

Mojo Monday #208

I needed to make a b-day card for my sister and I really liked this sketch design so....here's what I did! Now all I have to do is get it in the mail on time (an then not be late for work today!)
And because I was in such a hurry to get it in the mail, I forgot to take a picture of the inside of the card so I will list only the items used on the outside:
Paper/cardstock is from K&Company "Que Sera Sera" and Paper Studio
Flower is from StampingScrapping
Ribbon and shredded hem tape and rhinestone are from my stash
Stamped sentiment is from Inkadinkadoo
(Inside is a Verve stamped Bilble verse)

I am entering this card in the Mojo Monday Sketch Challenge #208 at http://mojomonday.blogspot.com/

Sunday, September 25, 2011

SSCC Sketch Challenge

One more card today! I followed the sketch challenge at the StampingScrapping Challenge Blog and this is what I came up with. The image is a Maggie but I do not know the name of it. Its so cute...just a row of blooming flower pots! Which you can color any color you like...how convenient!
So I'm entering this in the "Sketch Challenge" at http://stampingscrappingchallengecentral.blogspot.com/
Here's my list of ingredients:
Cardstock is DCWV from the "Indian Summer" collection
Image is a Magnolia* colored with colored pencils
Sentiment is for Woodware USA from the "Mary & Friends" set*
Die cut is Spellbinders Labels 16 *
Ribbon is from my stash, as well as the tiny brad
The 2 flowers are some that Karen S made and sent me (as a prize!). I added a little watercolor paint and some "Stickles" by Ranger.*
Glue Dots*
ScorTape*

*all of these items can be found at http://www.stampingscrapping.com/, at least that's where I got them!

Wow! They gave me one of the "Top 3 Awards" for this one! Thank you, SSCC!!

Round Embossed Card

Today I am posting a small round card that I made specifically to enter in 2 challenges:
http://houseofgilli.blogspot.com/ - #16 "Embossing"
http://woodwareusa-clearstamps.blogspot.com/ - #44 "A Fun Sketch"
Please let me know what you think of this one!


Ingredients:
Spellbinders die Big Scalloped Circles Large
Sizzix embossing plate Snow Flowers
Martha Stewart edge punch Doily Lace
Woodware USA sentiment stamp from "Mary & Friends"
Textured Cardstock "Best Occasions"
Cryogen white cardstock
EK Success Large Punch "Flowers & Leaves" (for the leaves)
Watercolor paints to add depth to the flower and leaves
Stampology ink, onyx
Glue Dots
American Crafts ribbon
AND, the flower is one more of the ones that Karen S sent me a couple months ago!
Still enjoying those little beauties, Karen! Thanks!